Sunday, April 2, 2017

How to raise caterpillars from eggs to butterflies

So you want to raise caterpillars. Congratulations! Maybe you want to help support the Monarch butterfly migration, or you want to share a biological investigation with your children, or you think it looks like fun. Whatever your reasons, I'm happy to help.

For the purposes of this post, I'm not going to go into how to get butterflies into your yard, that's another post. I'll assume at this point that you have a caterpillar or eggs in hand.

Please don't buy caterpillars online-- they may be sickly and you are very likely to find caterpillars in your own yard or garden, or in that of someone you may know. Many gardeners, if you ask them, would be overjoyed for you to remove caterpillars from their plants!

A Black Swallowtail caterpillar about to devour carrot greens.

Finding and Feeding caterpillars
Different types of butterflies need different hostplants for their caterpillars to eat. In my area the most common kind of butterfly is the Cabbage White (Pieris rapae). They aren't native to the U.S., but I think they're fine for your first try. It's easy to find a plant they'll eat: anything in the cabbage family -- radishes are probably the easiest and quickest to grow, and they're happy in a flowerpot if you don't have an in-ground garden. If you spot a radish whose leaves look pretty chewed up, that's a good clue you might find Cabbage White caterpillars on it.

Other caterpillars that are popular to raise include Black Swallowtails, which eat anything in the carrot family; and Monarchs, which eat any species of milkweed. My posts about raising caterpillars are collected here. Always make sure to identify caterpillars you find so you can provide the right hostplant. When I was a little girl I tried to raise caterpillars every summer by feeding them grass, because I didn't know they wouldn't eat just any plant. Of course, they all died. But you can do better!

Releasing one of my successful Black Swallowtails a few years ago.

Caterpillar Cages 
You'll need a container of some sort to keep your caterpillars in, that's closed to keep them safe. A jar  is fine with a paper towel or pantyhose fastened over the top. Your caterpillars will poop (a lot!), so to make cleanup easier, line the container with a piece of paper towel or even a coffee filter. Newly-hatched caterpillars are tiny, and their poops are barely bigger than dust, but soon the larvae will grow and so will the size of their frass (the actual name for caterpillar droppings). Leaving frass in the bottom of the container provides a great medium for nasty bacteria to grow, not a good idea.

My first set-up, with floral vial and paper towel.

When you are ready to move up in commitment (or your caterpillars get too big for their first container), you could use an old fish tank, even one that's no longer watertight. You can also buy professional caterpillar cages made of mesh. I have several of these cages-- one purchased at the thrift store, and four of different sizes that I bought online. You can see one above, where I'm releasing a butterfly. The benefit of the professional cages is that they let plenty of air through. They're collapsible too, so you can easily store them in the off-season.

Some DIY instructions are available here; a good discussion of different ways to set up a cage is here. The latter link is to Raising Butterflies' web site; their store also has good and relatively affordable cages. I can't remember where I originally bought my cages, but they look like the ones on Raising Butterflies.

This very hungry caterpillar is about to devour my carrot greens!

Feeding caterpillars, part 2
When raising caterpillars, you need to provide pesticide-free food for it. Ideally you'll have grown the plants yourself, but I realize not everybody has the space or time to do so. You may get permission from your neighbors, or even be lucky enough to find a vacant lot with the right hostplant.

If you don't have enough hostplants and neither do folks you know, another way to find food is to ask people you DON'T know. Join the Facebook group Raising Butterflies and Moths for Conservation; you'll find lots of helpful information there as well as like-minded folks. A simple post asking folks who live near you for help finding caterpillar food may solve all of your problems, as the friendly members tell you where you can find safe plants or offer you some from their own yards. Don't buy plants at the grocery store, even if they're organic. Organic farmers may treat their crops with Bacillus thuringiensis (or Bt), a bacterium that's deadly to caterpillars but harmless to people.

You don't need to put an entire plant in your caterpillar cage, cuttings are fine. Keep them fresh by placing stems in a cup of water, and make sure you protect the top of the cup so caterpillars can't fall in and drown. I use floral vials I get from buying roses; these are available online or at craft shops.

I prop my floral vials in a small glass inside the cage to keep them from falling.

Pupating
Your caterpillar will go through several instars, or stages, and molt each time between instars. Some species look different in different instars, like the Black Swallowtails I raise.The final molt will be into chrysalis.

Early instars of Black Swallowtails, like this little guy, are black and white; later they get green stripes as well.

When your caterpillar is close to that last molt, it will start wandering around. This is when it's essential to have your cage securely closed. My Black Swallowtail caterpillars walk a really long way, it seems, although I've never measured it. They're looking for just the right spot to make their chrysalis. At this point you should add a few twigs to the cage leaning against the walls at roughly a 45 degree angle.  If you can find twigs that have a few branches, that will give your caterpillars plenty of choice.

This little guy nearly escaped when I took the cage lid off for photographs.

One sign that your caterpillar is almost ready will be a final poop-- this will be very liquidy, not the compact frass you're used to. The caterpillar needs to get rid of any waste before spending days or even months in the closed case of its chrysalis.

Waste voided, this caterpillar is nearly ready to pupate.

Next the caterpillar will attach itself to a twig or the wall of the cage. It will spin a small button of silk and attach its abdominal end (cremaster) to that. Monarchs will then hang down vertically, eventually curling into a "J" shape. Swallowtails will spin themselves a sort of safety belt to support their front end and hang parallel to the wall or twig.

You can see the white silk belt the caterpillar spun to hold itself to the twig.

It takes a few days before the caterpillar actually molts. If you watch it closely you may see it occasionally twitching, like someone dreaming. I'm not sure what's going on here, but perhaps it's separating inside from the old caterpillar skin. When they molt, the chrysalis shell has already formed underneath the skin.

Halfway through shedding its caterpillar skin, you can see the chrysalis already emerging.

Depending on the species and generation, you may have to wait a couple weeks to several months for the butterfly to emerge, or eclose, from the chrysalis. I'll talk about that another time, plus what to do if a chrysalis falls.

Have fun! Let me know how your caterpillars fare.

Monday, January 16, 2017

How To Make Suet Cakes For Birds

A perky little Carolina Wren on my homemade suet
 
Ingredients
Animal fat (such as raw beef fat, raw pork fat, bacon drippings, or collected drippings from browning unspiced meats)
Peanut butter (either creamy or chunky)
Cornmeal
Oats
Birdseed (mixed seed and/or sunflower seed)
Bits of dried fruit (optional) 
Cracked corn (optional)

Equipment
A pot large enough to hold all the fat with extra room for the other ingredients
Spoon or rubber spatula
Freezer
Stove
Knife to cut cakes apart
Pan to hold suet mix while it chills
Plastic container, large plastic zip-close bag, or individual plastic zip-close bags to store suet cakes
Waxed paper to keep individual cakes from sticking to each other during storage

I signed up for Project Feederwatch again this winter. To keep lots of interesting birds coming to my yard, I have three seed feeders and two suet feeders. But since money is a little tight right now, I decided to see if making my own suet cakes would be any cheaper than buying them pre-made.

First off, you need animal fat. I’d been saving beef and pork trimmings for months, thinking I might make homemade stock.  I also added the drippings from cooking a pound of bacon, and the grease poured off from browning some ground beef earlier this week. If you haven’t been saving fat scraps for months like I did, you can sometimes buy chunks of raw beef fat (suet) from the butcher’s counter at your grocery store for fairly cheap. Of course, you could also just cook up a few pounds of bacon in order to make suet, yum! The birds get suet and you get bacon. Not a bad trade, if you ask me.

Chunks of fat starting to melt in my pan


Put all the fat in a pan over medium heat to render it. If you use fresh trimmings like I did, you’ll have chunks of meat and gristle to spoon out periodically as the fat melts off them. These  could probably be used later to make stock or broth, or as treats for very good pups or kitties. :-)

Eventually, the fat will all be melted, or rendered. While the fat is still warm, add peanut butter (about half the amount of the animal fat) and stir it in til it’s all melted. As I mentioned in the ingredients list, you can use either creamy or chunky peanut butter, whatever you have on hand already.

Gobs of peanut butter starting to melt into the fat


When the peanut butter is melted in, turn off the heat and add your dry ingredients. I had about 2 cups animal fat and 1 cup peanut butter, so to that I added 1 cup each of cornmeal, oats, mixed birdseed and sunflower seed.  You could use more or less of the seeds, or you could add other seeds you might have on hand that are safe for birds to eat. Just don’t use anything that would be invasive, and don’t use seeds that were sold for gardening as they may have been treated with fungicide or something else that’s not good to eat. You can also use dried fruit cut into little bits. This is a great use for hard, ancient raisins or dried apples that might have been forgotten at the back of your pantry! Some people like to add cracked corn to their suet cakes too.


Mix everything in the pan fairly quickly, as you don’t want it to solidify there. Pour the thick mixture into a pan to set. Most suet cages allow for a block about one inch thick, so keep that in mind when selecting your pan. You could also use smaller individual molds if you like. In that case I would recommend using molds that are flexible: either thin plastic containers, or super-cheap metal pans that are flimsy enough to be twisted a little. This will help you pop the cakes out later.

Set your pan(s) in the freezer to solidify. I left the house for a few hours so don’t know exactly how long mine took, but I would guess after an hour it should be solid enough. When the suet has hardened, cut it apart into cakes that will fit your suet cage or pop the cakes out of the individual molds. 

Basically energy bars for birds!


If you’re storing the cakes in one big container, layer them with waxed paper so it will be easier to get a single cake out when you want it. You could also put each cake in its own box or bag if that’s easier for you. Store the cakes in the fridge or freezer.

Fat is very high energy, so it’s great for feeding wild birds in the cold wintertime. I wouldn’t use this recipe to feed birds in the summertime, though, for two reasons. For one thing, summer heat means the fat will go rancid fairly quickly. Also, if nesting birds get the warm fat on their belly feathers, they could transfer it onto their eggs, smothering the chicks developing inside. Frigid wintertime is perfect for suet cakes though!

Such a fuzzy belly! I don't mind squirrels eating from my feeders, their antics are so amusing.


My suet was super popular with the birds and squirrels in my yard. The whole batch lasted only one week. I also made a mini batch again after the first batch was gone, using trimmings from just one chuck roast plus peanut butter & the dry ingredients. Keeping the proportions of two parts animal fat, one part peanut butter, one part cornmeal, one part oats, and one to two parts seeds/dried fruit/cracked corn, you can make as big or small a batch as you like. Using scraps you'd otherwise discard plus ingredients you probably already have on hand means these cakes are way cheaper than buying the pre-made ones from the store. It’s actually a lot of fun too, and feels really good to see the birds enjoying my handiwork.

Do you put suet out for your backyard birds? Let me know what birds you see at your suet, in the comments below. Have fun! 

Wednesday, December 21, 2016

How to make Homemade Hot Sauce

My very own hot sauce!


After years of growing hot peppers, I finally tried making my very own hot sauce this fall. I did lots of research online, reading chili grower message boards and perusing dozens of recipes from Pinterest and my favorite food blogs. Finally I felt like I had a good enough idea to give it a shot.

The pepper I grow is called Hot Lemon and has a faint citrus-y flavor under its heat. So I decided to make a vaguely tropical hot sauce with lemon juice, ginger, and pineapple. 

Ingredients for a fiery golden hot sauce!

Ingredients:

8-10 oz fresh hot peppers, rinsed and stemmed
3 inches of fresh gingerroot, peeled and cut into coins
2 C water
juice of two lemons (I had about ½ C)
enough white vinegar to make 1 C when combined with the lemon juice
½ large sweet onion, diced
½ C canned crushed pineapple
salt to taste (I used ½ tsp)

Instructions:

Saute peppers, ginger, & onion. I might have browned mine too much; the finished sauce was darker than I hoped.

Saute the peppers, onion, and ginger in a bit of olive oil for 5 minutes on high.
Next, add the water and simmer until water is mostly evaporated, 20-30 minutes.
When the water has evaporated, set the pepper mixture aside to cool.

Simmering

Nicely evaporated.

Combine the pepper mixture and the rest of the ingredients in a blender or food processor. Puree.
Taste (cautiously!! Have some milk handy to quench the fire in your mouth and cleanse your palate between tastings). Add a bit of salt if you want, maybe more pineapple. The amount of fire will depend on the type of pepper you use. Hot Lemons are pretty darn hot, not the level of habaneros but I think hotter than jalapenos, ounce for ounce.

Yum, pepper puree!

Next, pour the slurry into a fine mesh strainer set over a bowl, to strain out the solids. It will probably take a while, even if you work on pressing the mixture with the back of a spoon or a rubber spatula like I did. My mixture was so thick we let it strain overnight to make sure we got all the liquid out.

So thick the liquid needed to strain overnight.

Finally, pour the liquid into jars. I had hoped for color a little more sunny than what resulted; in hindsight maybe I shouldn’t have let the peppers brown quite as much. That probably wouldn't matter so much if my peppers were red to start with. 

I’m storing my hot sauce in the fridge; I’m sure you could also process bottles in a hot water bath to make them shelf-stable without refrigeration. We also saved the solids in a separate container. A tiny bit of the fresh solids in stir-fry was quite nice; we may dehydrate and powder them as a spice mix too.


Why yes, I did put the hot sauce in antique glass vials.

 
So how did it turn out? Quite hot. Much hotter than either Tabasco or Franks’s hot sauces, two of the commercial hot sauces that are regulars on our table. Honestly I can’t taste the lemonyness as much as I’d hoped because it’s so fiery. Maybe next time I’ll use a smaller batch of hot peppers but keep the liquid the same. I know the ginger adds a lot of fire too, so I’ll think about reducing that next time. But it’s still really good! Not perfect but I wouldn’t hesitate to offer this to my snootiest of hot sauce-loving friends.

After using the sauce for a couple of weeks we also decided it needs a bit more something, maybe garlic or even a dry spice like ground coriander seeds. Next time! This recipe still makes a good basic hot sauce with room for improvising.

Oh, another note: when we were making the hot sauce and tasting it for salt and such, we just had it straight, dabbing the tip of a finger into the sauce and onto our tongue. I mentioned having milk available to calm your palate between tests; I wish we had made rice or something to taste the hot sauce on, rather than just having the sauce all by itself. That would probably have made it easier to judge whether other flavors were needed beneath the heat.

Saturday, December 17, 2016

Been a little busy...

Hi all,

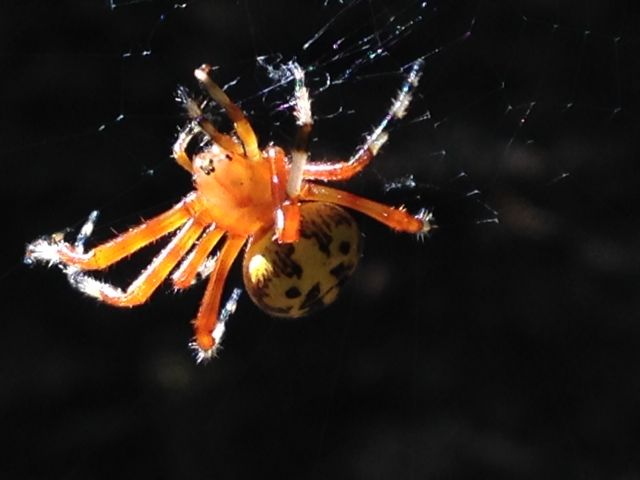
Just a quick note to apologize for the lack of posts this month. I took a really interesting course this semester, called Connecting to Science. I just gave my final presentation this week, so will start to catch up on posting here shortly. To hold you over, a butterfly and a spider:

Gray Hairstreak on ageratum

Pretty sure this is a female Spotted Orbweaver, Neoscona crucifera. Seen in NC, Oct 2015

Saturday, December 3, 2016

My Gardening Goals for 2017

After reviewing what I did wrong in my garden this year, I’ve already started planning what I want to try next year. Honestly I think the planning phase is one of my favorite parts of gardening. I get to imagine all the wonderful perfect veggies I imagine will come out of my garden, and of course in my imagination I have no troubles with overscheduling, pests, or unexpected weather issues!

A late season harvest from 2014, one of the best years so far for my garden.

My goals for next year fall into three main groups: techniques I want to try or continue; specific crops I want to grow; and results & motivational hopes.


Garden Planning & Techniques to try

I was definitely happy with growing separate crops in the “shoulder” fall and spring seasons this year, even if I didn’t get it perfect. Actually, I got the summer crops cleared out enough to plant my fall lettuce on time, but was then foiled by late warm weather in October and November. The lettuce actually bolted (went to seed) in mid November! Arrgh, so much for fresh fall and winter salads. Next year.


My tall, bitter lettuce after it switched into flowering mode.

So to improve next year, I need to be prepared to put up spring crops for storage if I haven’t consumed them all fresh by the time I need to plant for the summer. For example, I could make batches of yummy kale chips (which I've been meaning to try anyway), or quick-freeze kale to put it in soups and stir-fries later. Another way I might make sure I don’t have the same problem next summer is to plant my early crops in a separate bed that isn’t also supposed to grow summer crops. Then when the spring crops come out (whether that’s on time or not), I could plant that bed with a quick-growing cover crop to keep down weeds until it’s time to plant late fall crops.

Speaking of cover crops, that’s something I’ve been meaning to try for years. Again I run into the difficulty of having to pull my summer or fall crops while they are still producing. That probably is one of my biggest challenges in gardening! I can’t bear to rip out plants that might still give me more harvest if I just let them stay in the ground. I might be able to interplant a fall cover crop around the lingering summer tomatoes, though. That still means I need to at least order the seeds on time, which I didn’t do this year. I never got around to actually ordering any cover crop seeds, although I did spend quite a bit of time reading about them and planning what combination I’d like. If I do an early spring cover crop where the majority of my summer tomatoes, etc. will go, I might try fava beans. I love eating fresh favas when I can find them in the grocery store. I’ve read it’s good to mix a deep-rooted grain in there as well, such as rye. We’ll see; I have a lot more time to dream and plan this winter and peruse my favorite seed catalogs. As always, I'll make sure to list ideas in my garden journal. Maybe starting now and creating a calendar reminder for when to order seeds for a cover crop will help me finally achieve this goal!

Some of my favorite seed catalogs. I can't wait until this year's arrive!

So all those are fairly practical, realistic techniques to try. The most far-fetched goal I have for next year’s garden is to build a squash or cucumber archway, like this one I saw on Pinterest.  How fun would that be to be able to walk down an archway and see fruit dangling through the wire mesh? I think it would probably be a significant amount of work to build one, though, especially since I don’t have any raised beds yet that would serve as a base. I love the idea, though, so we’ll see what kind of time and energy and funds I have available this spring and summer.


Seeds and varieties to add or change

As for the actual seeds I order, over the last few years I’ve been trying to buy mostly heirloom varieties. It wasn’t because I dislike the bigger seed companies or want pure strains for saving seeds, I just really enjoy the feeling of being connected to previous generations who grew the very same variety. (I’ve dreamed of saving my own seeds, and do once in a while, but usually not for the more expensive heirlooms I’ve been buying like tomatoes.)

However, I’ve had smaller tomato and sweet pepper harvests than I wanted the past few years. Some of that is certainly my fault and/or due to weather, but I also suspect the varieties I’m choosing have generally smaller yields than modern hybrids would. Some heirloom varieties I’ll keep no matter what because I love their unique flavor, like the Cherokee Purple tomatoes from this summer and the Hot Lemon hot peppers that I've grown the past few years. (The hot peppers also are heavy yielding, so no complaints there.) Other than those, the heirlooms I’ve tried haven’t made up for small harvests with an overwhelmingly fantastic flavor. So next year I will probably try growing more hybrids in hopes of  a bigger harvest. As mentioned in my garden year wrap-up (linked above), I may also try an early-yielding variety to spread my season out a bit more. All the heirloom tomatoes I’ve been growing have fairly long days-to-maturity. For example, Cherokee Purples are listed at 80 days to maturity.


My fall tomatoes ripening on the counter. The round, dark ones at the back are Cherokee Purples.

I plan to try again to grow some of the seeds I ordered for 2016 but never planted, such as winter squash, cucumbers and cantaloupe.  (Maybe one or more of those will go over my archway trellis!) I missed having winter squash from the garden this year.

I also found I dearly missed my annual fall ritual of spending a few afternoons shelling beans. I love eating fresh shell beans as well as drying them for longer storage. So I’ve got to make room for beans in my 2017 garden. I enjoyed growing red beans last year, but found they were smaller than the Borlotto or Cranberry beans I used to grow, like this one.  I will grow those fat meaty beans again in 2017, and make sure I build tall enough trellises for their vines (six feet or more!).

Borlotto beans are delicious and gorgeous to boot!

In my flower beds, I want to try a couple things different from this year. I’d like to find room for some Tithonia, or Mexican Sunflower. Their bright orange daisy-like blooms seem to be magnets for butterflies at Brookside Gardens, especially Monarchs. I also want to plant more milkweed, but place it at the edge of one of my beds so it's more easily accessible. This year’s milkweed ended up getting lost in the center of the bed, so I couldn’t see whether I ever had monarch caterpillars. I should also try to get more than just a couple plants so I have a big patch of the milkweed, easily seen by butterflies cruising overhead. I may create  an entire bed that's just milkweed, for that matter. We'll see how much room I have.

American Lady enjoying the Tithonia at Brookside Gardens

I did enjoy the zinnias I grew this summer, but oddly enough the only colors that germinated were pink, orange, and white (from a seed mix packet—there should also have been reds and yellows in there). Hmm. I didn’t see a lot of butterfly activity on the zinnias but I was really busy much of the summer. I’m undecided on whether I’ll grow them again.

Results I’m aiming for-- Lots to put up!

As I mentioned in my wrap-up, I hardly stored anything from the garden this year. I didn’t really have time or energy to actually make a batch of tomato sauce even if I had a big enough crop, but I still hope to be able to do so next summer. If nothing else I could make a batch in my slow cooker while I’m at work. I also hope to pickle some cucumbers, store some winter squash, and of course dry some of my shell beans for cold weather soups.

So now that I’ve gotten my goals organized, I get to do the really fun part, which is reading new seed catalogs as they arrive in my mailbox. I’ll compare prices, disease resistance, days to harvest, and so forth. What are your goals and dreams for next year’s garden? Any favorite varieties you think I should grow? Please chime in the comments, I love hearing from you all!

Friday, November 25, 2016

Create Shelter: Build a Log Pile for Wildlife


Update:
My log pile has attracted an Eastern Chipmunk! I've seen more and more chipmunks around the neighborhood recently, including one foraging in one of my butterfly garden beds. Now I have proof that my log pile is helping provide shelter for this little cutie. Hooray! 
Eastern Chipmunk approves of my log pile.

For years I’ve been tossing fallen branches and stray logs in a haphazard heap in my back yard, hoping I was making good habitat for wildlife. I’ve been watching that pile, though, and don’t see much activity going on in and around it. Birds  land on the highest branches to watch out for predators before hopping down to forage on the ground. But that was about it. I wanted to build a more deliberate (and maybe neater) brush pile for my yard animals—from invertebrates like millipedes to wrens looking for shelter from the frigid winter winds (and maybe snacking on those milipedes too), plus perhaps attracting or at least being ready for new wildlife I’ve always hoped would find my yard hospitable: toads and box turtles. I’ve never seen these in my yard, but we do have at least box turtles in our small neighborhood park. So we shall see.

To figure out how to build a better log pile, I got lots of good information from the National Wildlife Federation’s backyard habitat program and from Cornell Lab of Ornithology’s YardMap project . I also consulted these resources to get ideas before I started:

I sketched the plan in my journal as well, to organize my thinking.
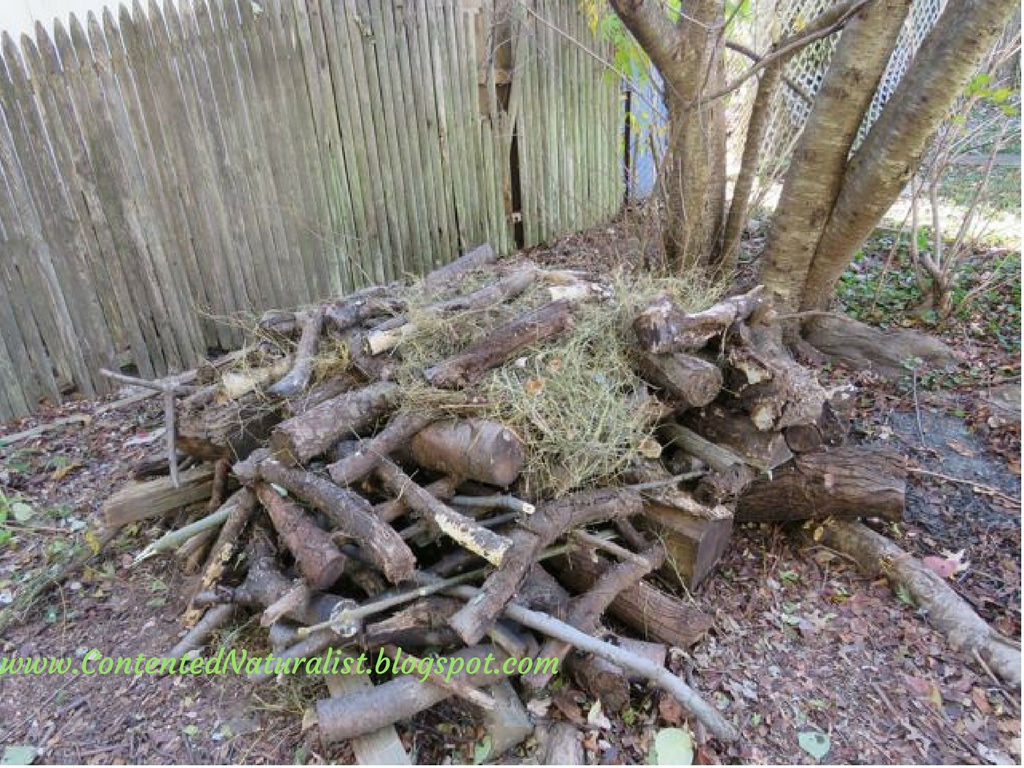
One difference between my haphazard heap of branches and a carefully built log pile is the amount of shelter available in each one. My branch heap really didn’t have much shelter from winds or predators, it was pretty loosely built. A constructed log pile using sturdy logs and some insulating leaves and dried grasses should provide plenty of reliable shelter. Most sites also recommended placing your log pile where your yard meets the forest to provide shelter for critters as they go between the two environments. I don't have any forest on my property, so I put the pile beneath our cherry tree and near the fence at the back of our yard.

To start a log pile, you first lay a layer of logs in parallel lines, about 6 to 8” apart from each other. Logs at least 6” diameter seem best so the resulting tunnels are big enough for ground critters to enter and run down without having to squish. I’m sure whatever size you have would be fine, however. Anything is better than nothing. Anyway, I didn’t have many logs even close to big enough. So I took the most ungainly hunks of firewood from our ancient and decomposing pile and lined them up in parallel lines. You do the best with what you have, right?

Hopefully the crevices between my shorter logs will provide shelter for some of the smallest creatures too.


Most of my reference sites suggested making your log pile size about 10 feet by 10 feet. I didn’t have enough wood or enough space for that, though, so mine is more like 6’ x 6’, and maybe 4’ tall. We’ll probably have to put up some kind of screening soon to make sure my still-ungainly pile doesn’t bother the neighbors. In the summer I’ll add some plantings to screen it naturally, but of course that doesn’t help me right now.
Your next layer will be more logs in lines perpendicular to the first ones. Many sites also recommend partially burying some short logs vertically at the sides to use as framework, and to hasten the decomposition process. Many subterranean creatures and fungi love rotting wood, so you’d be providing habitat for them too. I didn’t do this in my pile, partially because I didn’t feel like that much effort, but also because many of the logs I was using were already well on their way to decomposing. They really don't need any hastening there!


One of my logs was so well decomposed it already had residents!

Keep on alternating criss-crossing layers of logs. You can sometimes make layers where the logs are closer together than you started with, so there are varied size holes and shelters for different size critters. As the pile gets taller you can use smaller branches as well, both to create roofing and to help insulate different areas of the pile. You can even fill in some areas with loose dead leaves or dead grasses to make additional and different types of shelter.


Our younger cat, Callie, inspects my handiwork. Isn't her camouflage amazing?
I put dried grasses in some of the upper corners of the log pile, and later added armfuls of dried leaves in other spots too.

Build your pile as tall as you like. Most of the sites I looked at recommended you aim for 6 feet. That
seemed a little exorbitant for my yard and I was quickly running out of wood anyway. So mine is maybe 4.5 feet high at most. Again, something is better than nothing!

All done!
I’ve already seen a variety of small birds landing on top of my pile, and ducking in and out of the crevices. We have several Carolina Wrens in the neighborhood who will probably love the millipedes already inhabiting the rotten logs, to say nothing of the woodpeckers. Cardinals land on top to survey the yard, like they did my old branch heap. White-Throated Sparrows have crept into some of the lower tunnels to look for seeds and bugs too. I’m eagerly anticipating some light snowfalls this winter, when I can go look for footprints leading in and out of the pile to see the amount of use it’s getting.

Speaking of snow, when you have your pile as tall as it’s going to be, you can top it off with a layer of evergreen branches for additional shelter from rain and snow. I don’t have any evergreens in my yard to harvest branches from, but I plan to ask some of the local Christmas tree vendors for some extra branches they might otherwise discard. After Christmas I’ll clip all the branches from our tree and add them (and the now bare trunk) to the pile.


I love looking out at my log pile each day when I come down to the kitchen for coffee in the morning. It makes me feel so happy knowing I increased my yard’s amount and range of habitat! It only took me an hour or two to build, too.

If you have room in your yard, keep an eye out this winter for fallen branches and downed trees to build a log pile for wildlife. Then let me know in the comments what kind of wildlife visits your yard!

Wednesday, November 23, 2016

Caterpillars 2016-- I Might Have Gone A Bit Crazy


This year was a weird one for raising Black Swallowtail caterpillars. It's been six years now that I've done this (see here, here, and here), and in some ways I still feel like I'm just getting the hang of it. However, I think this fall was the most successful I've had in terms of how many chrysalises will be my companions for the next few months as they overwinter. Some people might even say I went a wee bit caterpillar crazy! :-)

The first two caterpillars of 2016 (that I found...)

The caterpillar season started slow this spring, due probably to the late cold weather we had. Finally in early May I found two big third-instar caterpillars chomping away on my garden dill. Hooray! A couple weeks later I found two more caterpillars, younger than the first two. That was it until the end of the month, when I found six tiny cream-colored eggs on the feathery dill plants. I was keeping a really close eye on the dill patches, it surprised me that it took so long and that I found so few eggs or caterpillars to start the summer. The single chrysalis that I had overwintered from 2015 took a long time to eclose too. The butterfly didn't come out until a couple weeks after I found those first two caterpillars! It was pretty nerve-wracking for a while, I was afraid it had died sometime during the winter.

So I had ten caterpillars total to start out. They all successfully pupated and I released them in the front yard near my flower garden. I have lots of dill growing freely in the garden, along with plenty of carrots. Despite plenty of larval hosts, however, I then entered a two-month dry spell of not a single egg or caterpillar found in my yard. I also plant lots of colorful flowers to attract and feed the adult butterflies, but saw no more Black Swallowtails of any phase in my yard until early September.

All three phases at once: freshly eclosed female, chrysalis under the far twig, and a teency caterpillar in the dill.


The second generation hatched and matured somewhere nearby, though, because on Labor Day weekend I finally found 15 (!) eggs-- long after my adults from earlier in the summer would have died. The majority of the eggs were on dill, and a few were on carrot greens. Fourteen of the eggs hatched about a week later. The fifteenth turned dark as if it was going to hatch like the others, but it never did.  A few days after Hatch Day I also found five more tiny caterpillars in the dill, surely from the same batch of eggs. We are very careful during the summer to meticulously examine all dill or carrot greens we pick during the summer, to make sure any eggs or caterpillars are given a chance to survive. On any given evening you're likely to find me and V in the kitchen turning a fragrant handful of feathery fronds over and over, looking from all angles for little cream-colored eggs or tiny black-and-white caterpillars clinging to the leaves. I definitely don't want to chomp into a little caterpillar when I'm eating my salad, or inadvertently slice one while chopping the herbs for a sauce! I also try to check the plants still in the garden at least every few days, usually on my way to the car in the morning or when I come home in the evening.

The same photograph as above, cropped to show the teency caterpillar better.

Over the course of September I found eight more caterpillars out in the garden, and brought them each in for protection from predators and parasites. My home office was full of busily munching larvae, and as they grew bigger and bigger I was kept hopping trying to make sure they never ran out of fresh dill or carrot greens to eat. I spent a lot of time trying to keep their cage clean, as well. Caterpillars are such little poop machines! I guess all baby creatures are, come to think of it. Unfortunately, I was so busy I forgot to take any photographs of the craziness.

Lots of dill in my garden-- it just about takes over! Good thing, I needed a lot with 27 caterpillars at once.

Once the caterpillars were getting huge and fat in their last instar, I put lots of branchy sticks in the cage, in hopes of convincing all 27 to pupate on convenient spots rather than attaching to the sides of the cage. Despite my efforts, though, when they were ready to pupate, some of the caterpillars chose to be extra contrary and crawled DOWN into the bottom of the glass bowls I use to cluster  individual water vials for the greens (see the purple one in the photograph above). I had never had any try to hide in the bowls before, and only noticed them one morning when I was putting fresh water in the vials. This meant that they'd been lying in shallow layers of their own and their siblings' poop for a day or two, yuck! (From now on I'll be checking those bowls more often!) I hastily pulled them all out and laid them on clean paper towels in the bottom of the cage. They were already in the prepupal phase, just waiting to dry out enough that they could molt into their chrysalis. I didn't know if they would be able to successfully molt while lying on the ground like that, but didn't see that I could do anything else since I'm unable to spin silk like they do.

Over the next few days I gently turned these prepupae over daily, making sure both sides got exposed to the air. As I did this, more and more of the other caterpillars started getting restless and wandering around the cage in search of a spot to pupate. In the end, all the other caterpillars did choose one of my twigs for pupating. I think this is the first year I don't have any chrysalises stuck to the sides of the cage!

Finally, one day I came down for my coffee in the morning and checked on the cage like usual. It was a joy to see that one of my "fallen" prepupa had successfully molted into a perfect brown chrysalis there on the floor of the cage. Hooray! Over the next three days all the other fallen prepupa did as well.

They are still lying on the floor of the cage as I write this. (I am away from home this week, and don't have a photo with me. I'll update once I get home, though.)Now that they're successfully in their papery chrysalis, I plan to attach them myself to twigs. I don't want to run the risk of them eclosing there on the ground and their wings drying crumpled, as I think might happen if I didn't fix things. I have reattached chrysalises before, and it's relatively easy. There's usually one or two who don't create secure enough attachments to their twig and either fall to the ground or otherwise need relocation, so I had to learn how to do that. I'll write a future post about reattaching a chrysalis, stay tuned. 

All in all, despite those empty months I had a pretty good summer for raising caterpillars. I even tried my hand at another species-- a Variegated Fritillary. Their larval host is the common violet, so I've let a LOT of violets colonize my garden areas. I found one late-instar caterpillar a couple years ago, but at the time decided trying to raise two species at once would be too complicated.  This summer when I actually saw a Variegated Fritillary oviposit in my yard, I brought one egg inside to raise. Sadly, the caterpillar failed in its second instar. I don't know what went wrong, but I'm glad I got the chance to try anyway.


One of this year's Black Swallowtails, just before she flew off into the wild.

My totals for this summer are as follows:

Eggs found: 21 Black Swallowtail, 1 Variegated Fritillary
Eggs hatched in captivity: 20 Black Swallowtail, 1 Variegated Fritillary
Caterpillars found in the wild: 17 Black Swallowtail
Caterpillars molted to chrysalis: 37 Black Swallowtail
Overwintered chrysalises successfully eclosed: 1 Black Swallowtail
Summer Chrysalises successfully eclosed: 10 Black Swallowtail
Failures: 1 Black Swallowtail egg, 1 Variegated Fritillary caterpillar
Chrysalises to overwinter into 2017: 27 Black Swallowtail

Stay tuned til the spring to see how my overwintering chrysalises do!

I'm linking up with Saturday's Critters too.
Blogger Widget