Friday, November 25, 2016

Create Shelter: Build a Log Pile for Wildlife


Update:
My log pile has attracted an Eastern Chipmunk! I've seen more and more chipmunks around the neighborhood recently, including one foraging in one of my butterfly garden beds. Now I have proof that my log pile is helping provide shelter for this little cutie. Hooray! 
Eastern Chipmunk approves of my log pile.

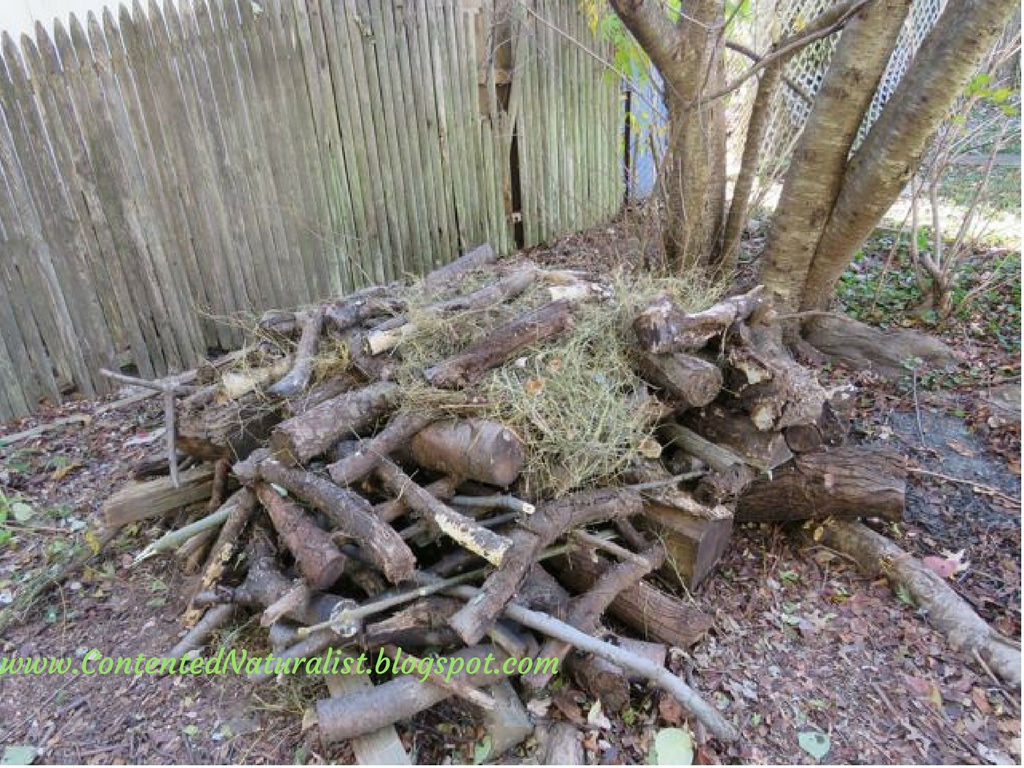
For years I’ve been tossing fallen branches and stray logs in a haphazard heap in my back yard, hoping I was making good habitat for wildlife. I’ve been watching that pile, though, and don’t see much activity going on in and around it. Birds  land on the highest branches to watch out for predators before hopping down to forage on the ground. But that was about it. I wanted to build a more deliberate (and maybe neater) brush pile for my yard animals—from invertebrates like millipedes to wrens looking for shelter from the frigid winter winds (and maybe snacking on those milipedes too), plus perhaps attracting or at least being ready for new wildlife I’ve always hoped would find my yard hospitable: toads and box turtles. I’ve never seen these in my yard, but we do have at least box turtles in our small neighborhood park. So we shall see.

To figure out how to build a better log pile, I got lots of good information from the National Wildlife Federation’s backyard habitat program and from Cornell Lab of Ornithology’s YardMap project . I also consulted these resources to get ideas before I started:

I sketched the plan in my journal as well, to organize my thinking.
One difference between my haphazard heap of branches and a carefully built log pile is the amount of shelter available in each one. My branch heap really didn’t have much shelter from winds or predators, it was pretty loosely built. A constructed log pile using sturdy logs and some insulating leaves and dried grasses should provide plenty of reliable shelter. Most sites also recommended placing your log pile where your yard meets the forest to provide shelter for critters as they go between the two environments. I don't have any forest on my property, so I put the pile beneath our cherry tree and near the fence at the back of our yard.

To start a log pile, you first lay a layer of logs in parallel lines, about 6 to 8” apart from each other. Logs at least 6” diameter seem best so the resulting tunnels are big enough for ground critters to enter and run down without having to squish. I’m sure whatever size you have would be fine, however. Anything is better than nothing. Anyway, I didn’t have many logs even close to big enough. So I took the most ungainly hunks of firewood from our ancient and decomposing pile and lined them up in parallel lines. You do the best with what you have, right?

Hopefully the crevices between my shorter logs will provide shelter for some of the smallest creatures too.


Most of my reference sites suggested making your log pile size about 10 feet by 10 feet. I didn’t have enough wood or enough space for that, though, so mine is more like 6’ x 6’, and maybe 4’ tall. We’ll probably have to put up some kind of screening soon to make sure my still-ungainly pile doesn’t bother the neighbors. In the summer I’ll add some plantings to screen it naturally, but of course that doesn’t help me right now.
Your next layer will be more logs in lines perpendicular to the first ones. Many sites also recommend partially burying some short logs vertically at the sides to use as framework, and to hasten the decomposition process. Many subterranean creatures and fungi love rotting wood, so you’d be providing habitat for them too. I didn’t do this in my pile, partially because I didn’t feel like that much effort, but also because many of the logs I was using were already well on their way to decomposing. They really don't need any hastening there!


One of my logs was so well decomposed it already had residents!

Keep on alternating criss-crossing layers of logs. You can sometimes make layers where the logs are closer together than you started with, so there are varied size holes and shelters for different size critters. As the pile gets taller you can use smaller branches as well, both to create roofing and to help insulate different areas of the pile. You can even fill in some areas with loose dead leaves or dead grasses to make additional and different types of shelter.


Our younger cat, Callie, inspects my handiwork. Isn't her camouflage amazing?
I put dried grasses in some of the upper corners of the log pile, and later added armfuls of dried leaves in other spots too.

Build your pile as tall as you like. Most of the sites I looked at recommended you aim for 6 feet. That
seemed a little exorbitant for my yard and I was quickly running out of wood anyway. So mine is maybe 4.5 feet high at most. Again, something is better than nothing!

All done!
I’ve already seen a variety of small birds landing on top of my pile, and ducking in and out of the crevices. We have several Carolina Wrens in the neighborhood who will probably love the millipedes already inhabiting the rotten logs, to say nothing of the woodpeckers. Cardinals land on top to survey the yard, like they did my old branch heap. White-Throated Sparrows have crept into some of the lower tunnels to look for seeds and bugs too. I’m eagerly anticipating some light snowfalls this winter, when I can go look for footprints leading in and out of the pile to see the amount of use it’s getting.

Speaking of snow, when you have your pile as tall as it’s going to be, you can top it off with a layer of evergreen branches for additional shelter from rain and snow. I don’t have any evergreens in my yard to harvest branches from, but I plan to ask some of the local Christmas tree vendors for some extra branches they might otherwise discard. After Christmas I’ll clip all the branches from our tree and add them (and the now bare trunk) to the pile.


I love looking out at my log pile each day when I come down to the kitchen for coffee in the morning. It makes me feel so happy knowing I increased my yard’s amount and range of habitat! It only took me an hour or two to build, too.

If you have room in your yard, keep an eye out this winter for fallen branches and downed trees to build a log pile for wildlife. Then let me know in the comments what kind of wildlife visits your yard!

Wednesday, November 23, 2016

Caterpillars 2016-- I Might Have Gone A Bit Crazy


This year was a weird one for raising Black Swallowtail caterpillars. It's been six years now that I've done this (see here, here, and here), and in some ways I still feel like I'm just getting the hang of it. However, I think this fall was the most successful I've had in terms of how many chrysalises will be my companions for the next few months as they overwinter. Some people might even say I went a wee bit caterpillar crazy! :-)

The first two caterpillars of 2016 (that I found...)

The caterpillar season started slow this spring, due probably to the late cold weather we had. Finally in early May I found two big third-instar caterpillars chomping away on my garden dill. Hooray! A couple weeks later I found two more caterpillars, younger than the first two. That was it until the end of the month, when I found six tiny cream-colored eggs on the feathery dill plants. I was keeping a really close eye on the dill patches, it surprised me that it took so long and that I found so few eggs or caterpillars to start the summer. The single chrysalis that I had overwintered from 2015 took a long time to eclose too. The butterfly didn't come out until a couple weeks after I found those first two caterpillars! It was pretty nerve-wracking for a while, I was afraid it had died sometime during the winter.

So I had ten caterpillars total to start out. They all successfully pupated and I released them in the front yard near my flower garden. I have lots of dill growing freely in the garden, along with plenty of carrots. Despite plenty of larval hosts, however, I then entered a two-month dry spell of not a single egg or caterpillar found in my yard. I also plant lots of colorful flowers to attract and feed the adult butterflies, but saw no more Black Swallowtails of any phase in my yard until early September.

All three phases at once: freshly eclosed female, chrysalis under the far twig, and a teency caterpillar in the dill.


The second generation hatched and matured somewhere nearby, though, because on Labor Day weekend I finally found 15 (!) eggs-- long after my adults from earlier in the summer would have died. The majority of the eggs were on dill, and a few were on carrot greens. Fourteen of the eggs hatched about a week later. The fifteenth turned dark as if it was going to hatch like the others, but it never did.  A few days after Hatch Day I also found five more tiny caterpillars in the dill, surely from the same batch of eggs. We are very careful during the summer to meticulously examine all dill or carrot greens we pick during the summer, to make sure any eggs or caterpillars are given a chance to survive. On any given evening you're likely to find me and V in the kitchen turning a fragrant handful of feathery fronds over and over, looking from all angles for little cream-colored eggs or tiny black-and-white caterpillars clinging to the leaves. I definitely don't want to chomp into a little caterpillar when I'm eating my salad, or inadvertently slice one while chopping the herbs for a sauce! I also try to check the plants still in the garden at least every few days, usually on my way to the car in the morning or when I come home in the evening.

The same photograph as above, cropped to show the teency caterpillar better.

Over the course of September I found eight more caterpillars out in the garden, and brought them each in for protection from predators and parasites. My home office was full of busily munching larvae, and as they grew bigger and bigger I was kept hopping trying to make sure they never ran out of fresh dill or carrot greens to eat. I spent a lot of time trying to keep their cage clean, as well. Caterpillars are such little poop machines! I guess all baby creatures are, come to think of it. Unfortunately, I was so busy I forgot to take any photographs of the craziness.

Lots of dill in my garden-- it just about takes over! Good thing, I needed a lot with 27 caterpillars at once.

Once the caterpillars were getting huge and fat in their last instar, I put lots of branchy sticks in the cage, in hopes of convincing all 27 to pupate on convenient spots rather than attaching to the sides of the cage. Despite my efforts, though, when they were ready to pupate, some of the caterpillars chose to be extra contrary and crawled DOWN into the bottom of the glass bowls I use to cluster  individual water vials for the greens (see the purple one in the photograph above). I had never had any try to hide in the bowls before, and only noticed them one morning when I was putting fresh water in the vials. This meant that they'd been lying in shallow layers of their own and their siblings' poop for a day or two, yuck! (From now on I'll be checking those bowls more often!) I hastily pulled them all out and laid them on clean paper towels in the bottom of the cage. They were already in the prepupal phase, just waiting to dry out enough that they could molt into their chrysalis. I didn't know if they would be able to successfully molt while lying on the ground like that, but didn't see that I could do anything else since I'm unable to spin silk like they do.

Over the next few days I gently turned these prepupae over daily, making sure both sides got exposed to the air. As I did this, more and more of the other caterpillars started getting restless and wandering around the cage in search of a spot to pupate. In the end, all the other caterpillars did choose one of my twigs for pupating. I think this is the first year I don't have any chrysalises stuck to the sides of the cage!

Finally, one day I came down for my coffee in the morning and checked on the cage like usual. It was a joy to see that one of my "fallen" prepupa had successfully molted into a perfect brown chrysalis there on the floor of the cage. Hooray! Over the next three days all the other fallen prepupa did as well.

They are still lying on the floor of the cage as I write this. (I am away from home this week, and don't have a photo with me. I'll update once I get home, though.)Now that they're successfully in their papery chrysalis, I plan to attach them myself to twigs. I don't want to run the risk of them eclosing there on the ground and their wings drying crumpled, as I think might happen if I didn't fix things. I have reattached chrysalises before, and it's relatively easy. There's usually one or two who don't create secure enough attachments to their twig and either fall to the ground or otherwise need relocation, so I had to learn how to do that. I'll write a future post about reattaching a chrysalis, stay tuned. 

All in all, despite those empty months I had a pretty good summer for raising caterpillars. I even tried my hand at another species-- a Variegated Fritillary. Their larval host is the common violet, so I've let a LOT of violets colonize my garden areas. I found one late-instar caterpillar a couple years ago, but at the time decided trying to raise two species at once would be too complicated.  This summer when I actually saw a Variegated Fritillary oviposit in my yard, I brought one egg inside to raise. Sadly, the caterpillar failed in its second instar. I don't know what went wrong, but I'm glad I got the chance to try anyway.


One of this year's Black Swallowtails, just before she flew off into the wild.

My totals for this summer are as follows:

Eggs found: 21 Black Swallowtail, 1 Variegated Fritillary
Eggs hatched in captivity: 20 Black Swallowtail, 1 Variegated Fritillary
Caterpillars found in the wild: 17 Black Swallowtail
Caterpillars molted to chrysalis: 37 Black Swallowtail
Overwintered chrysalises successfully eclosed: 1 Black Swallowtail
Summer Chrysalises successfully eclosed: 10 Black Swallowtail
Failures: 1 Black Swallowtail egg, 1 Variegated Fritillary caterpillar
Chrysalises to overwinter into 2017: 27 Black Swallowtail

Stay tuned til the spring to see how my overwintering chrysalises do!

I'm linking up with Saturday's Critters too.

Saturday, November 19, 2016

Garden Reflections 2016: Three mistakes I made


This year was a challenging one, both for me and for my veggie garden. Weather in particular was challenging, plus I took a second job for the end of the summer that left me only one day per week free to do all my chores, writing, gardening, butterflying, etc. Yikes. I think it wouldn’t have been quite so bad though if I hadn’t made a few key mistakes:

1. Letting my spring crops take over the summer
Lacinato kale turns into monsters if you let grow from spring all the way through fall!


I was so proud of myself this year for actually fulfilling my plan to have some “shoulder season” crops in the ground when it wasn’t yet warm enough for things like tomatoes. However, when it came time to swap them out I just couldn’t bear to pull plants that were still producing. I didn’t harvest my beets until mid June, and my spring Lacinato kale is actually still in the ground! (I haven't gotten around to harvesting the kale yet partly because of a whitefly infestation which I keep hoping will die down once we get frost.) So several summer direct-sow crops never got planted: cantaloupe, shell beans, summer squash and winter squash.

My Red Ace beets, delicious despite the late harvest. Definitely a good keeper variety.
  • Next year I need to either plant less of my spring veggies (so they’re gone by the time I need to replace them), or not be so ambitious with plants to reuse the same beds for both spring and summer crops.
  • Also I may want to look at planting even earlier in the spring: the beets and carrots in particular were slow growing so didn’t seem ready to harvest when I needed to pull and replace them.

2. Setting out peppers and tomatoes late

We had some really cold, wet, rather miserable weather late this spring. I used this as an excuse to procrastinate planting my tomato and pepper seedlings. I told myself they’d get stunted if I planted them at the usual time—each weekend I looked at the weather forecast and saw chilly temps. But in the end I planted them so late it wasn’t until October and even November that either variety of tomatoes (Amish Paste & Cherokee Purple) or sweet peppers (Red Snapper & Quadrato Giallo D'Asti) really started bearing significant amounts of fruit. I have a couple dozen green tomatoes on my kitchen counter right now that I’m trying to ripen. I know I wasn’t the only gardener in the area to have this problem-- it really was an unpleasant spring for warmth-loving veggies like the tomatoes. But in Grow It Eat It’s season wrap-up post I read a great suggestion for next year—stagger the plantings. I usually grow at least two plants each of each tomato variety. So rather than putting all my eggs in one basket, next year I’ll try putting half out on time, and half a couple weeks later. That would spread out the harvest, as well as protect against losing everything to a late cold snap.

The first really decent batch of tomatoes from my garden this year, harvested on November 11.

  • I may also want to check the days-to-maturity on my chosen varieties, for that matter. If I’m choosing all tomatoes that have a long time to vearing the first ripe fruit, I may not be able to get much before August even with a staggered planting. I’ve been trying a lot of heirlooms the past few years, enjoying the connection with previous generations. But I’ve come to think maybe that shouldn’t be my top criterion for selection.  Rather, I need to focus on what’s both tasty and productive for me & my garden. 

3. Finally, I think the biggest mistake I made this summer was not mulching the garden at all. 

Look at all those weeds creeping through the fence on the right! Arrgh.

We were very tightly budgeted so I had to cut somewhere. The usual 13-17 bags of mulch were one big and easy thing to cross off the "to buy" list. However, that meant the garden suffered more than usual with drought, and worse, the weeds were rampant. When mid summer came and I tried working a few summer camp sessions to get extra hours, I just didn’t have the energy let alone time to keep on top of weeding. When I did get around to it, I would end up pulling huge armloads of grasses and other weeds. I have two composting areas—one to make compost for my veggie garden, one to make “weedy” compost for filling in other areas. I put weeds, especially ones gone to seed, in the latter area so I’m not reintroducing more pests and weeds seeds to the garden when I turn in compost. Anyway, that area is way overflowing now, in fact there are mini haystacks of dried grasses beside the compost bins. Our cat Caleb has actually decided they make quite a pleasant bed in the sunshine. Hooray for silver linings, I guess?

  •  So next year I definitely need to find the money to buy mulch. If we’re still really hard up I should at least get a few trunkloads of the free stuff given out by the county—when I could afford it I’ve skipped that source, not knowing what’s in it. Would I make matters even worse by incorporating weed-ridden mulch in my veggie garden? But after the lessons of this year I think maybe it’s worth the risk.

  • I had also hoped to try a cover crop this winter to help cut down on spring weeds. But I never got around to ordering the seeds so that fell by the wayside. I’d still like to try it next year though, so stay tuned.

What lessons did you learn from your garden this year? Share in the comments so we can all learn too.

Also, if you’ve ever tried community compost sources, what were your experiences? Am I right to fear weeds and other contamination, or overly cautious? Let me know what you think.

Monday, November 14, 2016

Five Fantastic Nature Parks in Florida


To me, nature in Florida is exotic and amazing. The lush tropical swamps and marshes, the tangled mangroves, the bright aroma of citrus orchards, and of course the year-round cacophony of vivid flowers and verdant foliage.  It's a far cry from the chilly winters in Maryland where I now live, to say nothing of Massachusetts where I grew up!

So I love going birding and/or butterflying in Florida when I have the chance. I used to visit the Sunshine State frequently while growing up, since my maternal grandmother lived in Delray Beach. My husband & I got married in Disney World as well, so the two of us spent lots of time in Florida while planning the wedding, and in the years since.

Over the years we've explored many parks all over the eastern United States in search of butterflies and birds. Some were successes, some not. If, like me, you enjoy exploring nature and wildlife, Florida is a great state for it! Sometimes it's hard to narrow down park recommendations when you're just starting to explore an area and don't already have a local contact. Florida has so many awesome parks, it's hard to choose which ones to visit. So to help with that, here are five of my favorite places (so far) to look for either birds or butterflies in Florida.

1. Orlando Wetlands-- Orange County
This park isn't actually in Orlando or even very close-- it's more than an hour's drive east of Orlando, in a tiny town called Christmas. (That was a bit of a surprise to me the first time, I planned our inital visit when we were also at Disney World and I thought it would be a quick side trip. Not very quick, but definitely worth it! We've been back many times since.)

Juvenile Little Blue Heron at Orlando Wetlands

The network of canals and shallow lagoons holds waterfowl galore, plus of course many alligators. The Environmental Education center also has a small butterfly garden around it with interpretive labels. The park offers buggy rides to get you further out than you might go just walking. Make sure you check the Wildlife Sightings list outside the visitor center before you head onto the trails, too, in case any good species have been spotted that you could target. I always try to make an entry in these kinds of lists when I finish a visit, to make sure other folks know what's there and also to let park staff know how much we appreciate their conservation work.

Sneaky Sandhill Crane beneath the birdfeeder

The most recent trip we made included a close encounter with a Sandhill Crane who had found the bounty of the birdfeeder next to one of the picnic shelters. Clever bird!

2. Boyd Hill Nature Preserve-- Pinellas County
Despite being right in the midst of St Petersburg, this park has a huge diversity of habitat, from dry scrub to wetland to lake's edge. Thus it hosts lots of butterflies and birds. The Nature Center also has an aviary with several raptors such as peregrine, harrier, osprey and Bald Eagle, all of which also occur naturally at the park. I have to admit, though, my favorite part of this park is encountering the adorable Gopher Tortoises lumbering across the paths.  I don't know why they strike me as particularly cute, but they do, they're so grumpy and curmudgeonly. Just look at this individual:

This grouchy Gopher Tortoise wasn't so pleased to encounter us!

3. Fred & Idah Schultz Preserve-- Hillsborough County

This park was down a tiny gravel road, if I remember correctly. Like Boyd Hill, it consists of a mix of sandy scrub and wetlands. There were tons of flowers blooming when we last visited, and butterflies everywhere. This is where I got my first Oak Hairstreak, a real thrill. Other butterfliers in the area visit the park regularly, and sometimes post their lists to the sightings page for NABA (North American Butterfly Association). That's how I first heard of the park, by finding a trip report there that included some of my target species.

My first Oak Hairstreak butterfly. Sorry for the obscured view, I chased this little devil quite a bit before getting a decent look.

4. Loxahatchee NWR-- Palm Beach County
This is definitely a sentimental favorite, as my grandmother used to volunteer here and we frequently visited with her. It's made up of both cypress swamp and a network of sloughs, or canals, and thus has lots of waterfowl, waders, and alligators. I didn't pay attention to butterflies back when I was a kid, but in 2015 V and I went on a grim, cloudy day and still found good butterflies. Sadly, few of the photos from that day were worth anything. Check out their website for more information, though!

5. Wakodahatchee Wetlands-- Palm Beach County
This small park is  run by the Palm Beach County water management folks. It's actually designed to help process and filter wastewater from one of their water reclamation plants.  The main attraction is a 3/4 mile long boardwalk the winds through the wetlands so you can get right up close to birds and other wildlife. It's really cool being able to walk right through the marsh and watery areas. Honestly I have not visited Wakodahatchee since before I got into butterflies. I used to visit frequently with family when we were visiting my grandmother, though, and remember loving the birding opportunities there.

What are your favorite parks in Florida to find birds and butterflies? Share in the comment section, and I'll add them to my "must visit" list for next time!
Blogger Widget